FreeRTOS and MicroROS environment guide
Table of Contents
Getting Started
Welcome to the FreeRTOS and MicroROS environment documentation. This guide will help you get started with development.
Follow these steps to set up your environment and get ready to run your project:
Create a new CubeMX project.
Integrate the MicroROS module into your project.
Flash your code to the STM32H750VBT6 microcontroller.
Create and run your MicroROS agent.
1. Create a new CubeMX Project
Follow these steps to configure the required project settings:
Create a new CubeMX project in
File -> New Project.To configure the RCC module, go to
System Core -> RCC -> High Speed Clock (HSE)and selectCrystal/Ceramic Resonator. Do the same for theHigh Speed Clock (HSE)setting.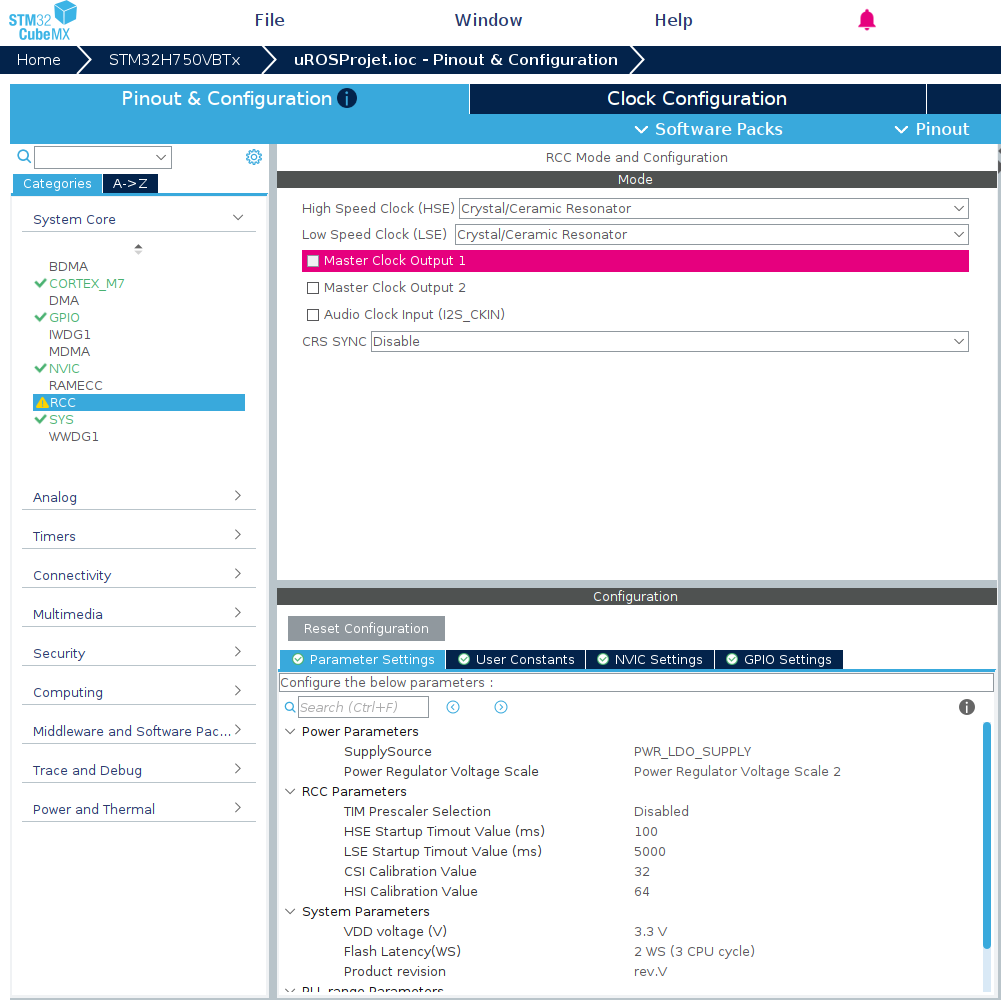
In
System Core -> SYS -> Timebase Source, selectTIM6. This setting is required to avoid conflicts, because the SysTick timer is used by FreeRTOS.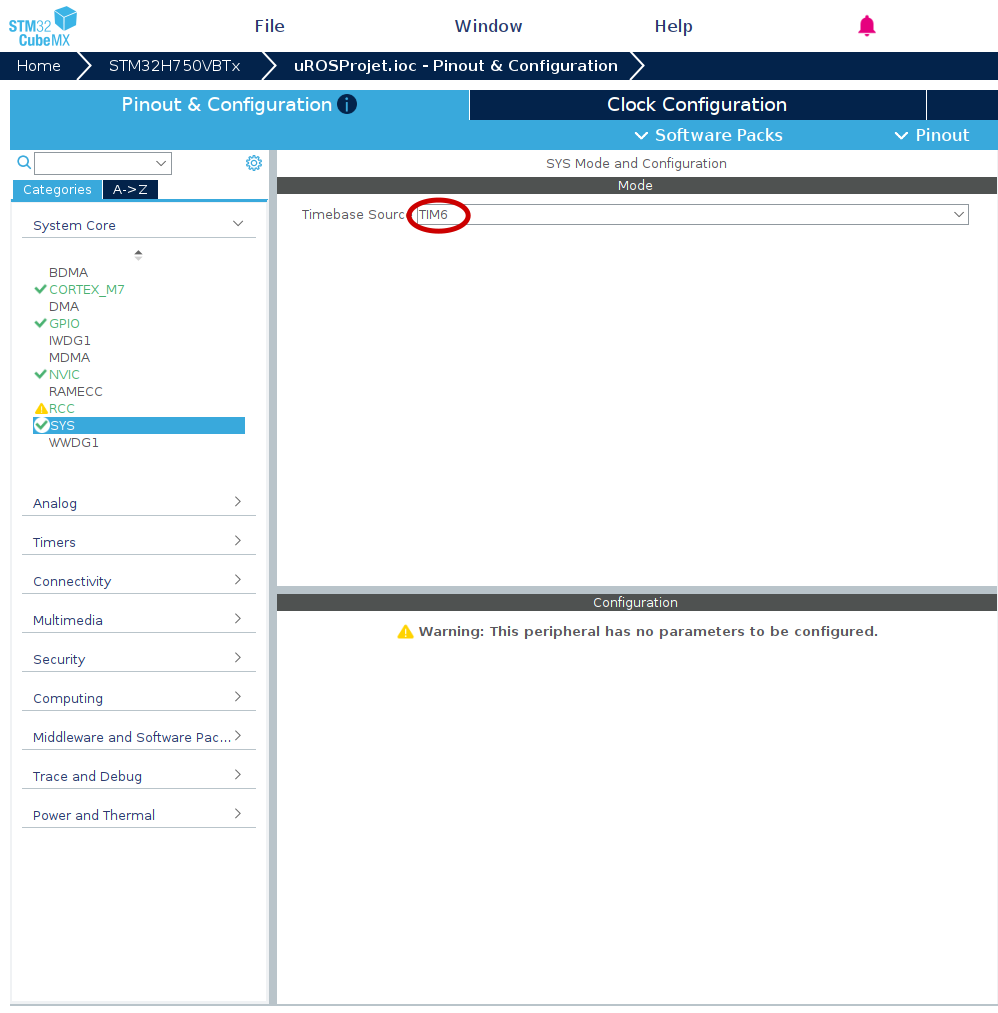
Enable RTC Clock in
System Core -> RTC.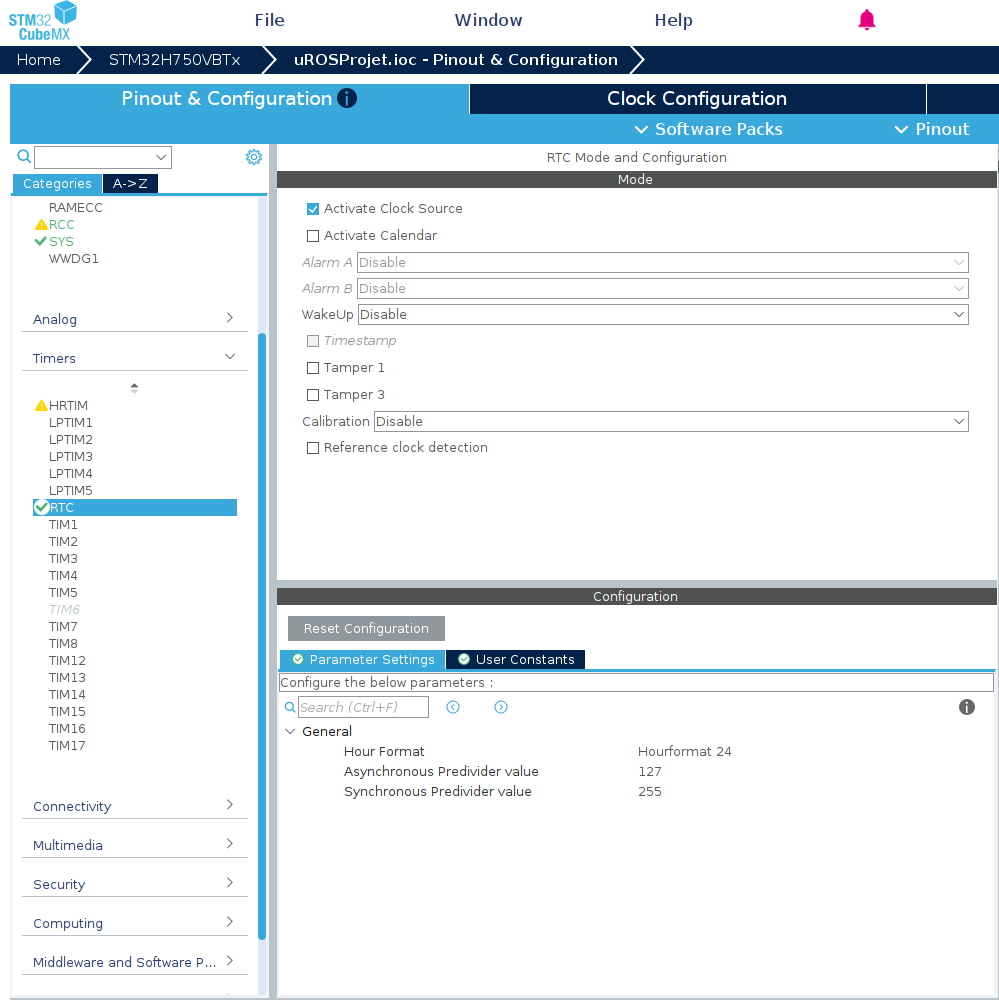
In
Connectivity -> SPI1 -> ModeselectFull-Duplex Master.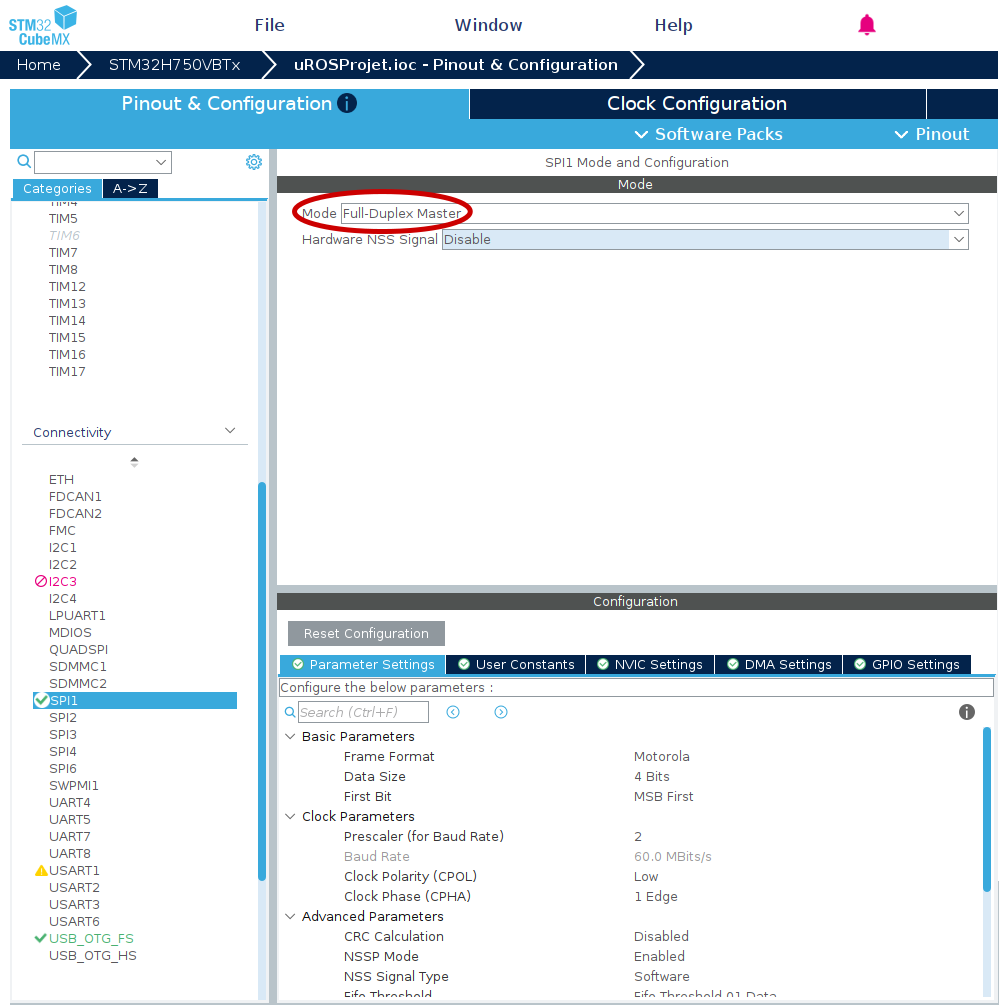
In
Connectivity -> USB_OTG_FS -> Mode, selectDevice_Only. Then, inNVIC Settings, enableUSB On The Go FS global interrupt. You may choose any suitable connection method, as long as the USB peripheral is initialized correctly.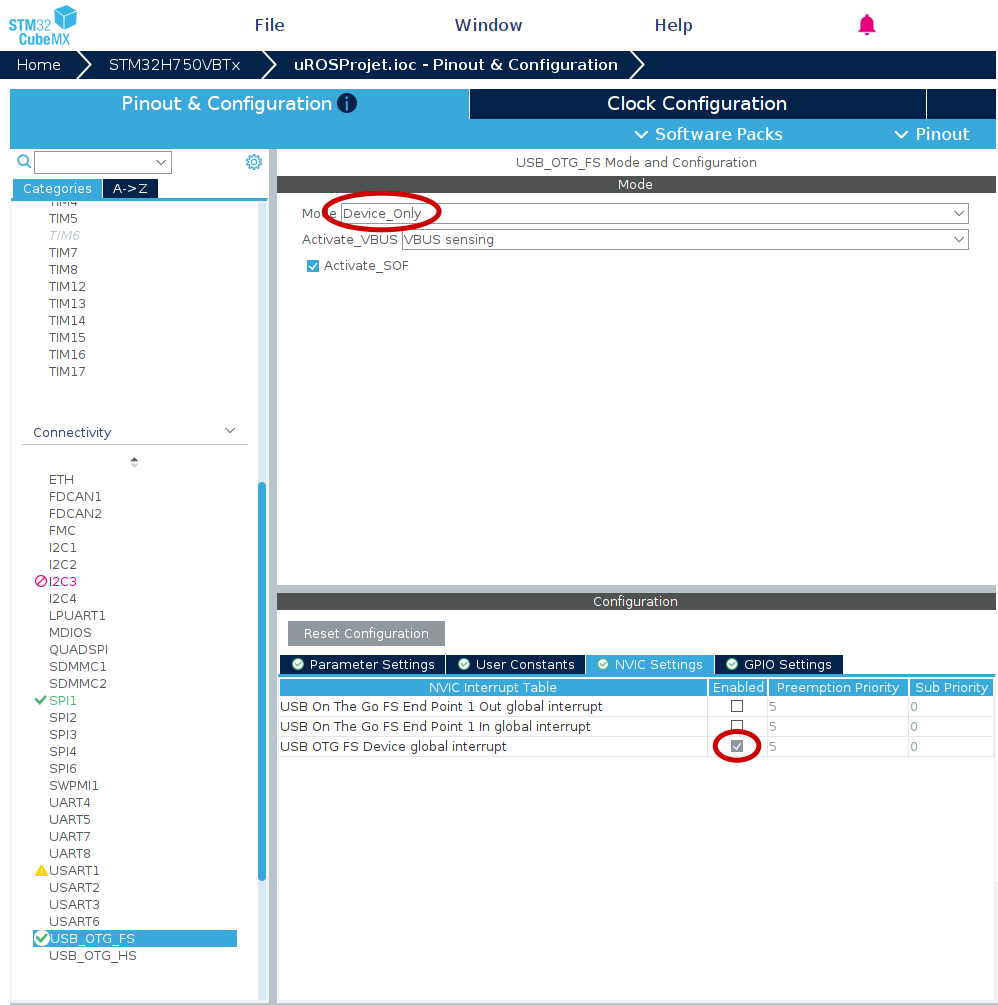
Do not forget to enable USB OTG FS Global interrupt in NVIC settings. So when there is a USB event, the microcontroller will create an interrupt to handle USB communication.
In
Middleware -> FREERTOSselectCMSIS_V2.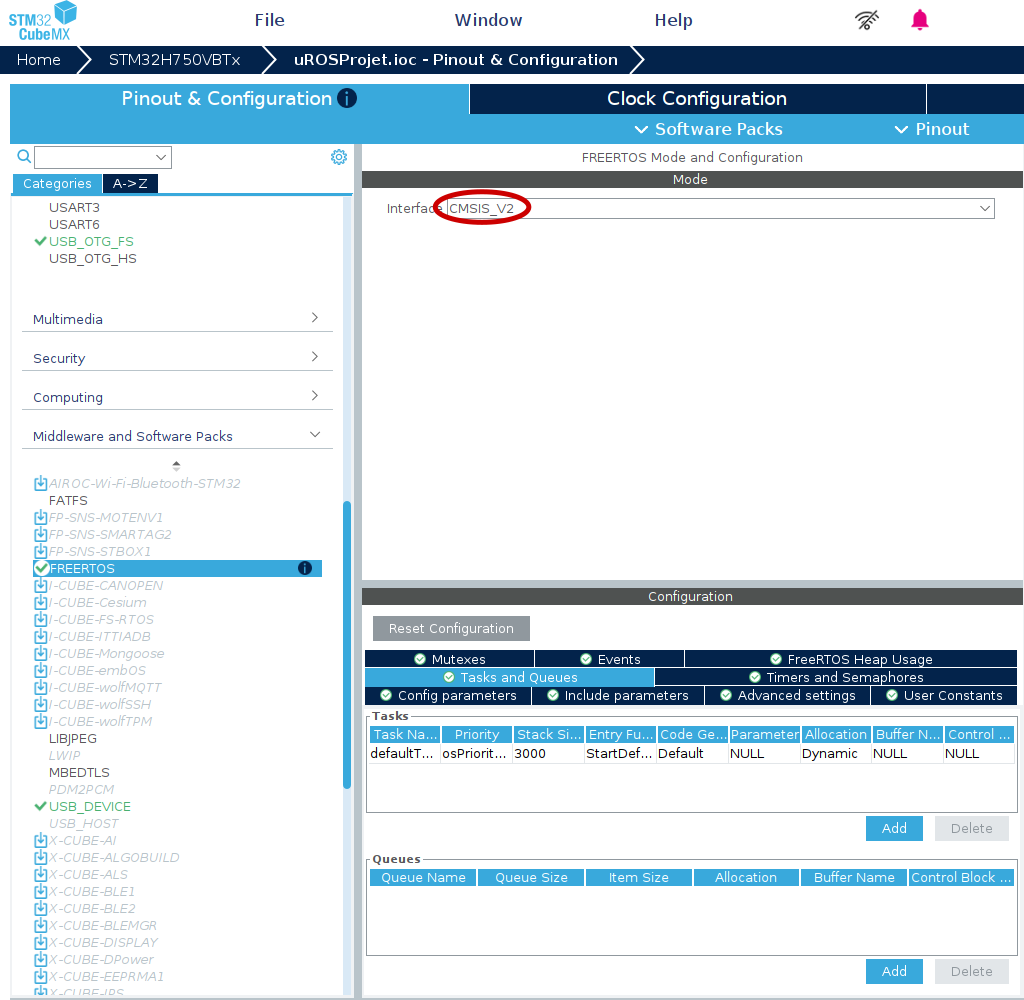
In
Middleware -> FREERTOS -> Configuration -> Tasks and Queues, add a new task with a stack size greater than 10 kB (10,000 bytes). This is recommended because one word is 4 bytes, so 4 × 3,000 = 12,000 bytes.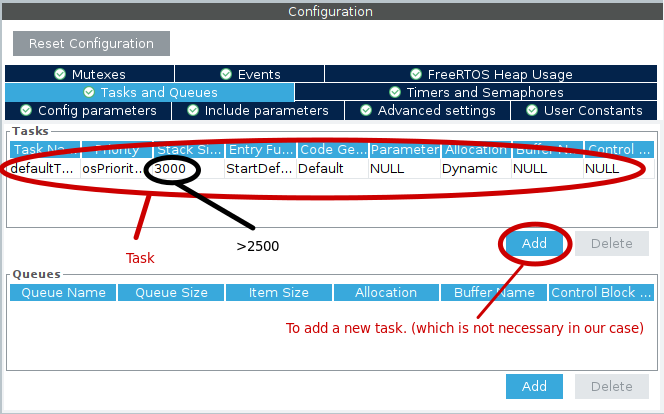
In
Middleware -> USB_DEVICEselectCommunication Device Class (Virtual Port Com).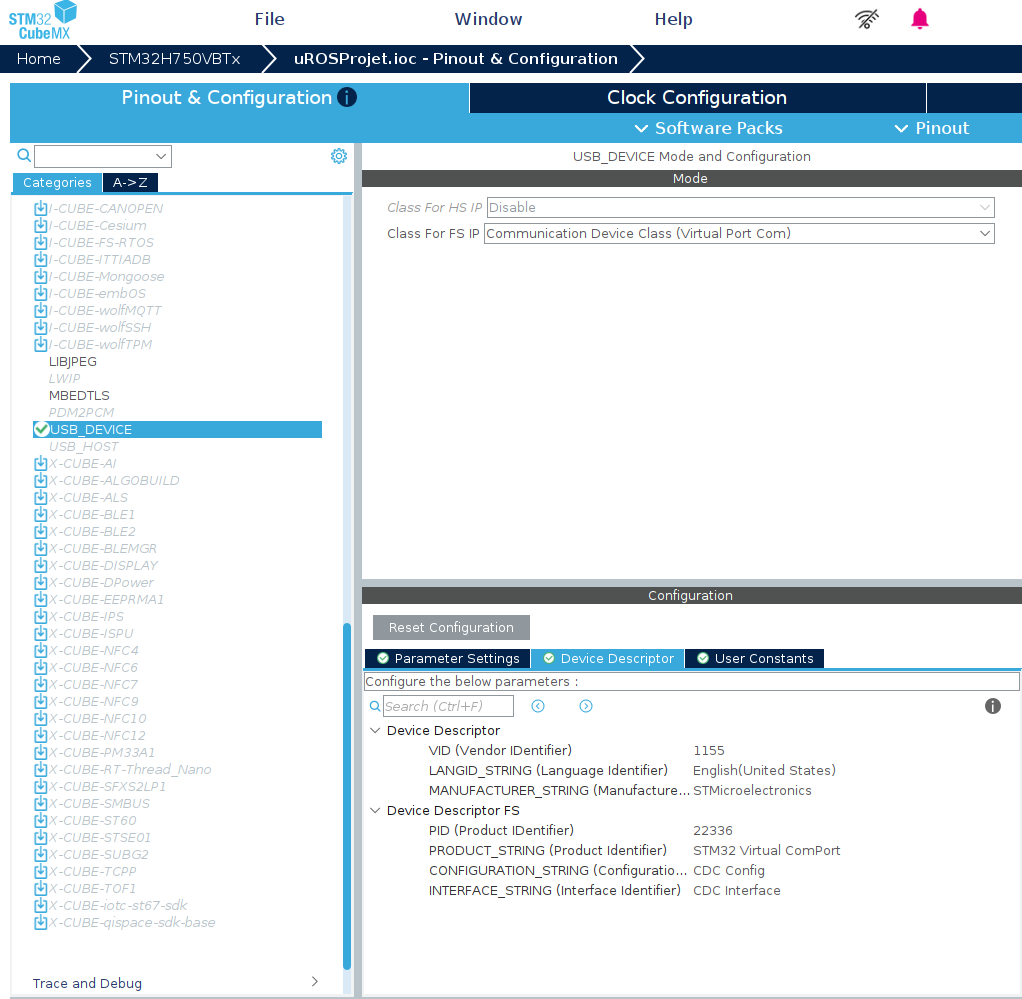
Then activate the
DEBUGconfiguration, so you can use the STLink :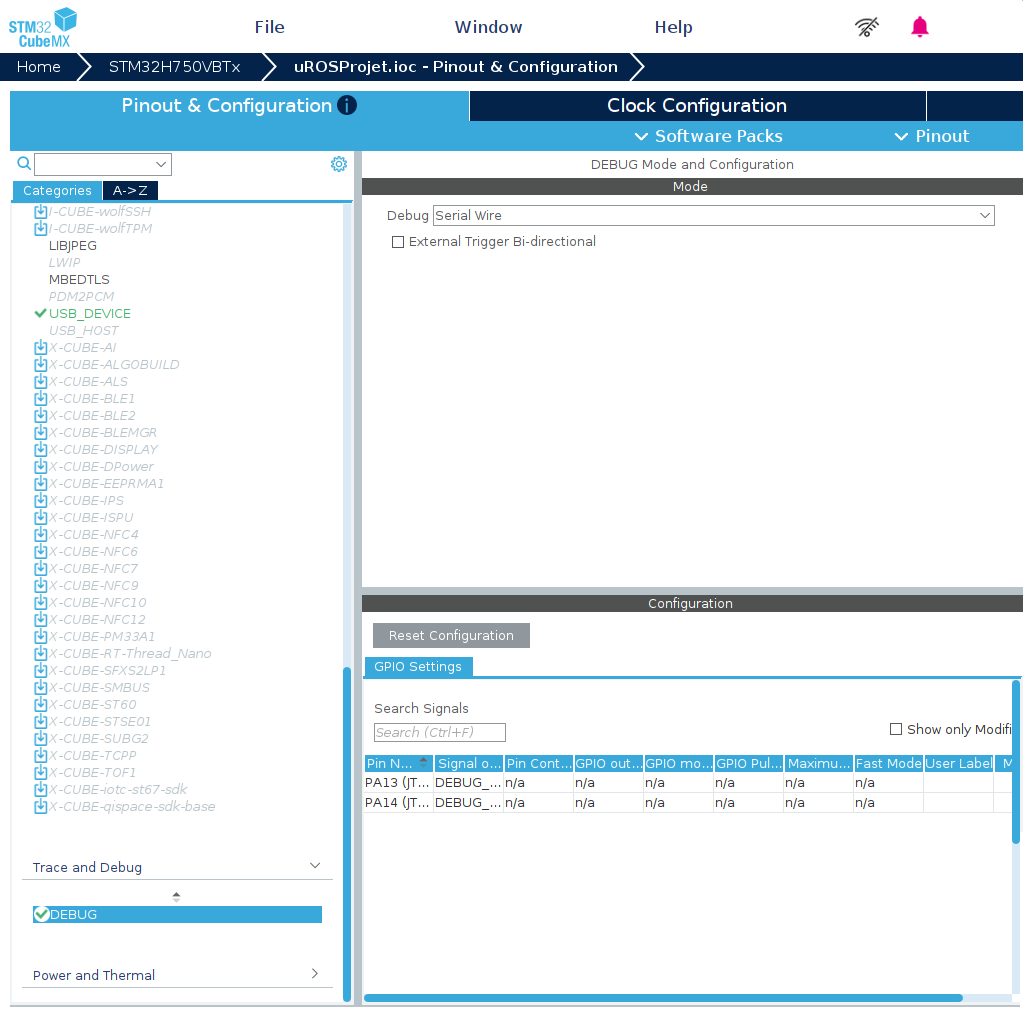
Configure the
clock treeas needed. For example, you can use the following setup: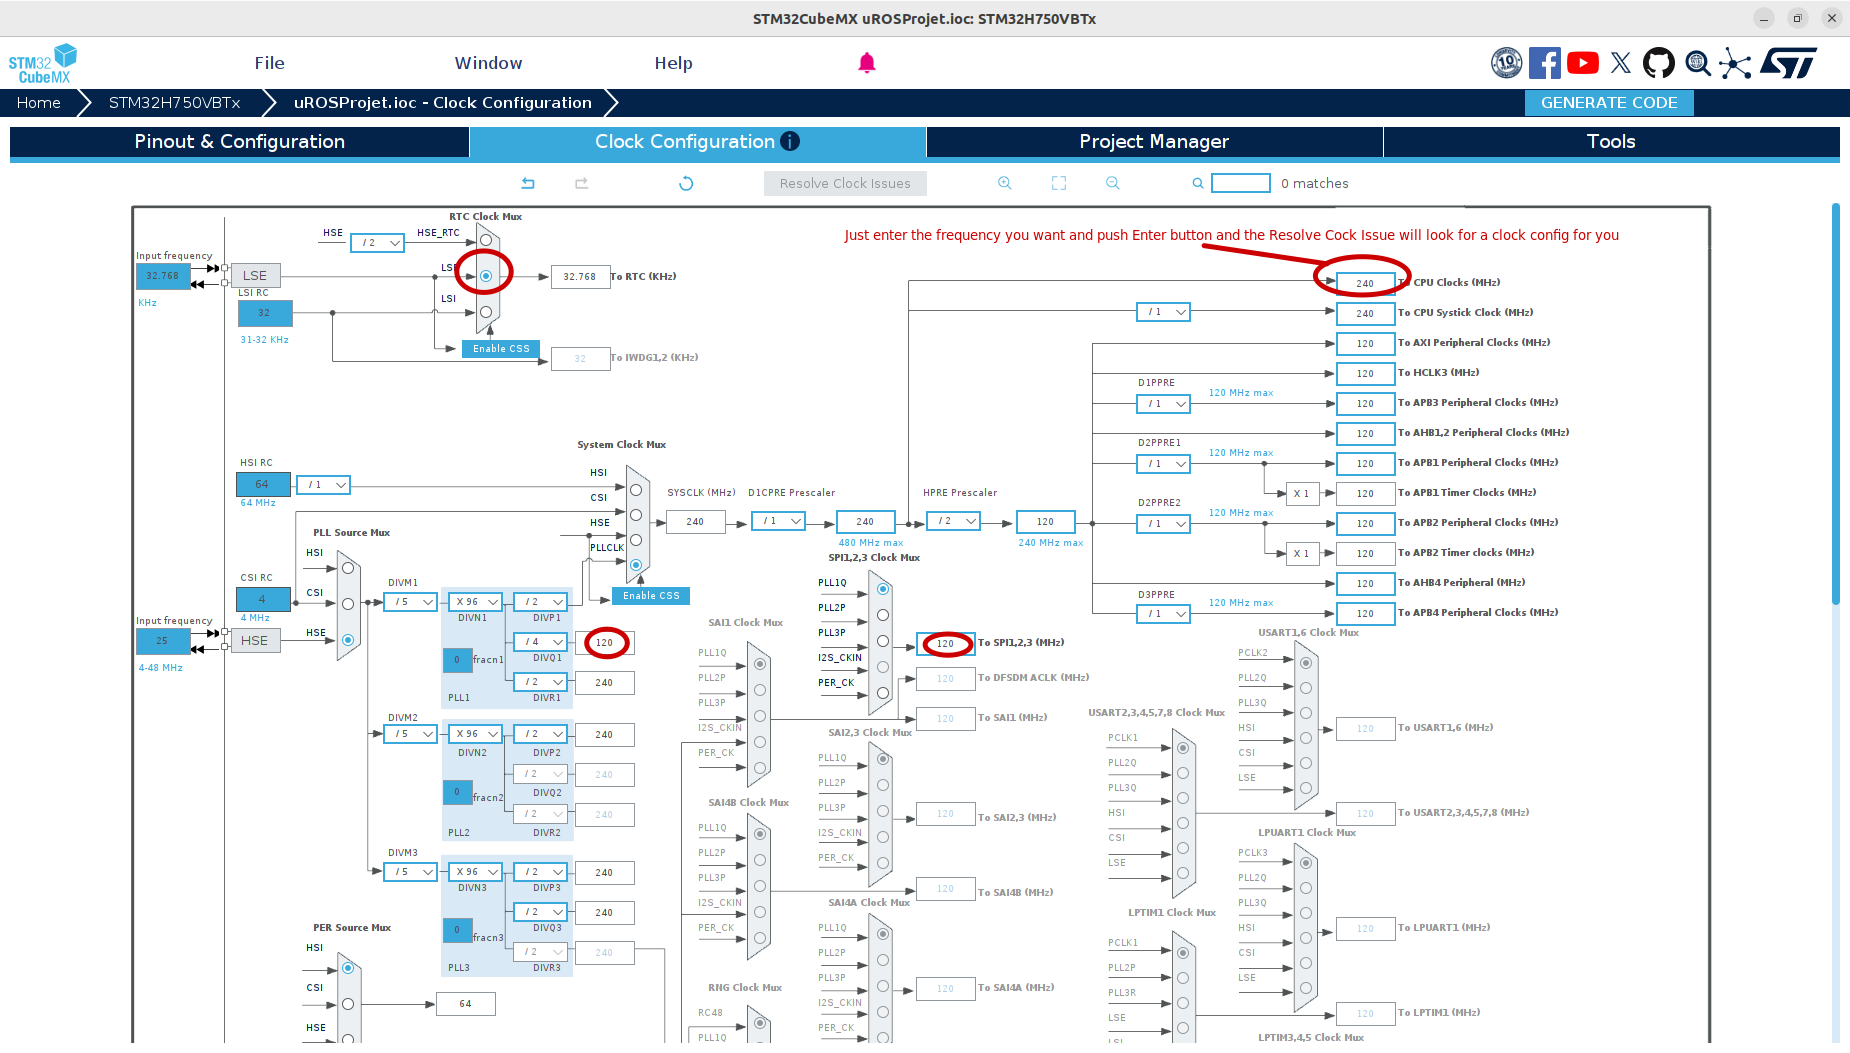
The second part is shown below:
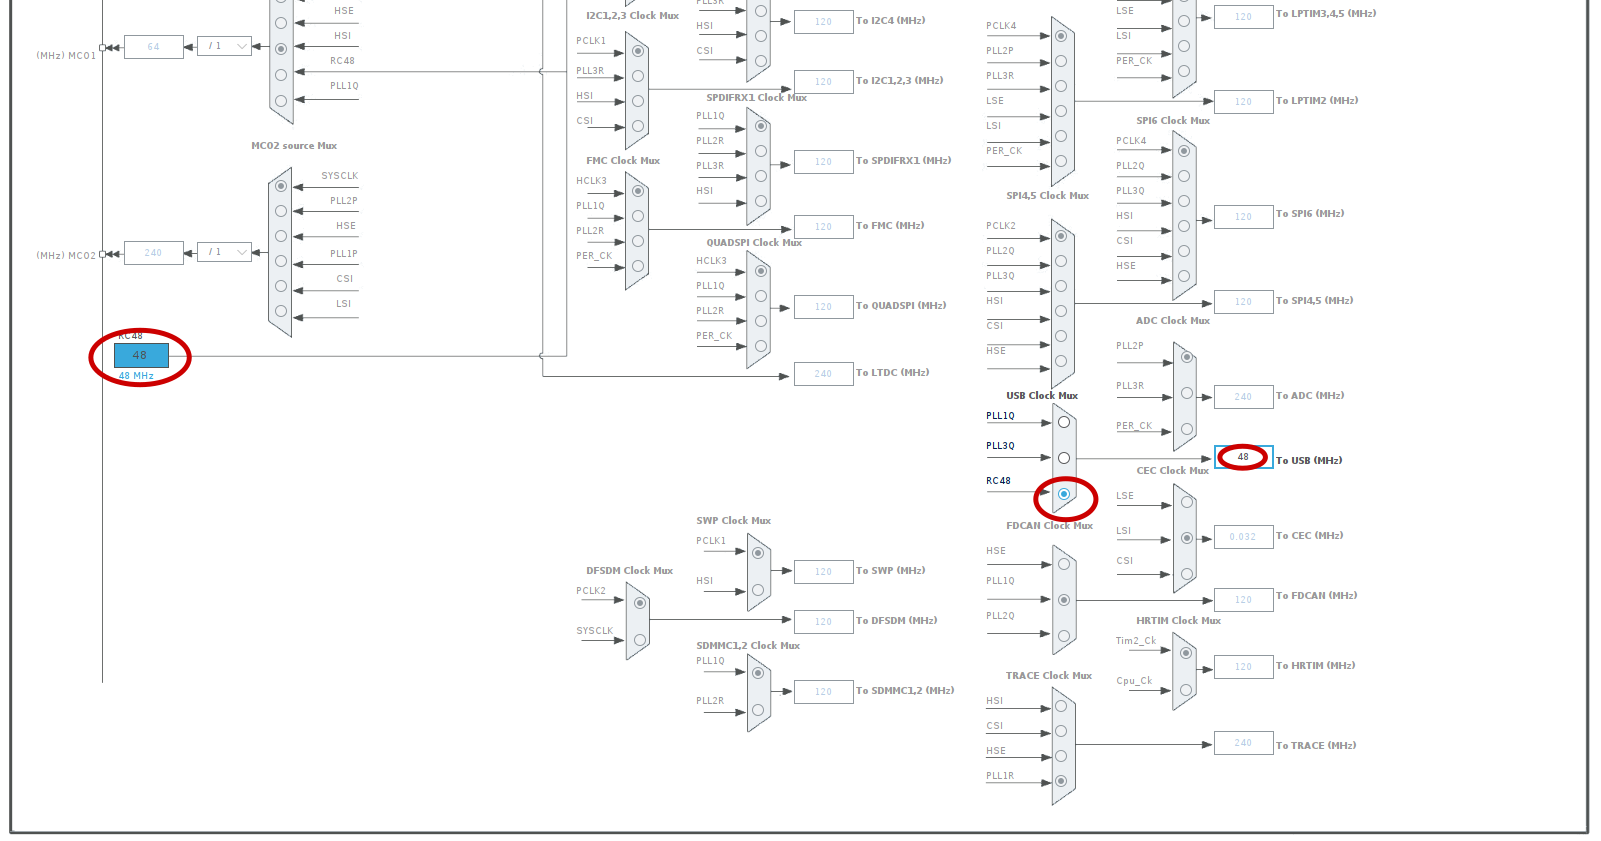
Select the GPIOs you need for your project, configure the timers if needed (Interruptions, PWM, etc.).
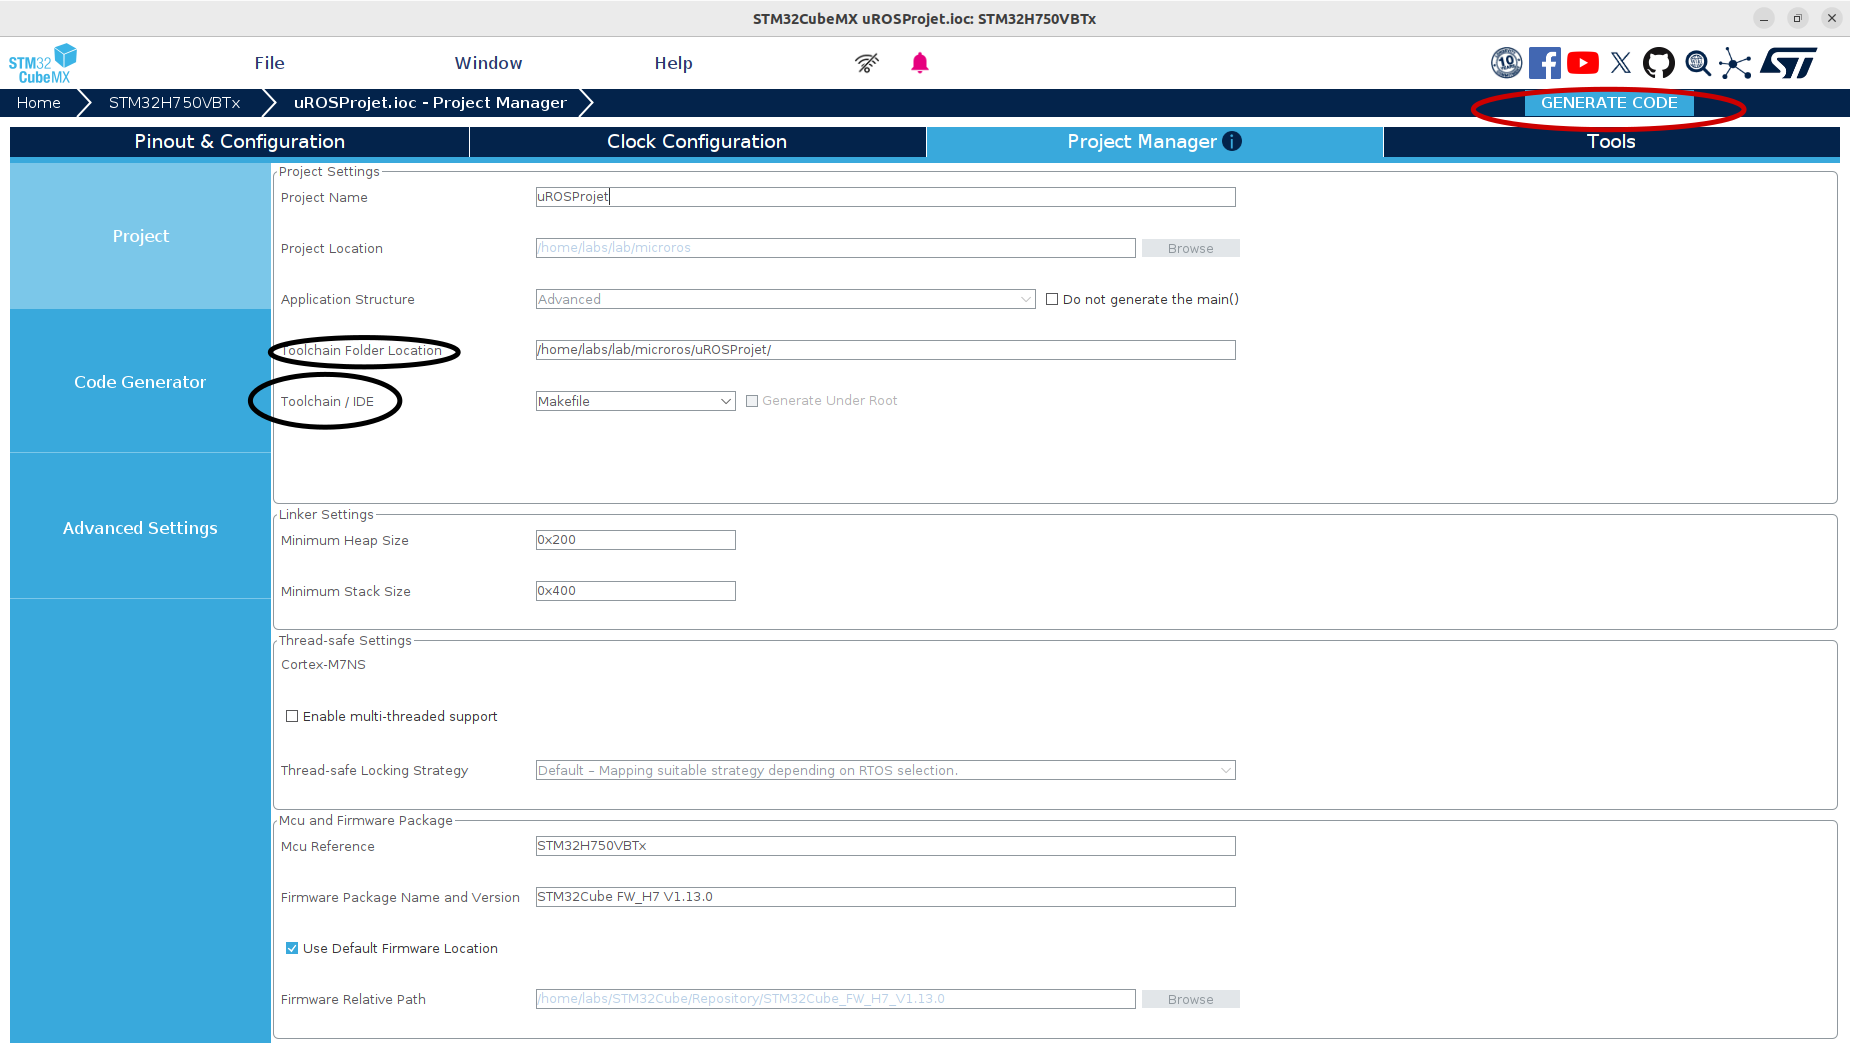
Go to
Project Manager -> Projectand select where to generate your code inToolchain Folder Location.Also in
Project Manager -> Projectselect what type of project you want to create inIDE/Toolchain(Makefile project, CMake, STM32CubeIDE …etc); for our example we’ll generate a Makefile project.Generate the code and open the project in your IDE.
Note: The Cortex-M7 core is enabled by default and helps you implement multithreading.
2. MicroROS module integration
Now that you’ve created your CubeMX project, you can integrate the MicroROS module. Follow these steps:
Clone the MicroROS repository from GitHub into your project directory: https://github.com/micro-ROS/micro_ros_stm32cubemx_utils.git.
Run
cd micro_ros_stm32cubemx_utilsand switch to the humble branch on Ubuntu 22.04, or to the jazzy branch on Ubuntu 24.04, usinggit checkout humbleorgit checkout jazzyrespectively.Then go back to the root of your project, open the Makefile and paste this code at the end :
#######################################
# micro-ROS addons
#######################################
LDFLAGS += micro_ros_stm32cubemx_utils/microros_static_library/libmicroros/libmicroros.a
C_INCLUDES += -Imicro_ros_stm32cubemx_utils/microros_static_library/libmicroros/microros_include

# Add micro-ROS utils
C_SOURCES += micro_ros_stm32cubemx_utils/extra_sources/custom_memory_manager.c
C_SOURCES += micro_ros_stm32cubemx_utils/extra_sources/microros_allocators.c
C_SOURCES += micro_ros_stm32cubemx_utils/extra_sources/microros_time.c

# Set here the custom transport implementation
#C_SOURCES += micro_ros_stm32cubemx_utils/extra_sources/microros_transports/dma_transport.c You can uncomment this line if you use dma_transport
C_SOURCES += micro_ros_stm32cubemx_utils/extra_sources/microros_transports/usb_cdc_transport.c

print_cflags:
   @echo $(CFLAGS)
Pull and run the following Docker image to generate the micro-ROS library. Make sure you use the correct ROS version when pulling and running the container. This step must be executed from the root folder of your project.
# Pull the docker image (use the right ROS version)
docker pull microros/micro_ros_static_library_builder:humble
# Run the docker container with the current directory mounted
docker run -it --rm -v $(pwd):/project --env MICROROS_LIBRARY_FOLDER=micro_ros_stm32cubemx_utils/microros_static_library microros/micro_ros_static_library_builder:humble
If the tool prompts for CFLAGS and you see some values, continue. They may look like this:
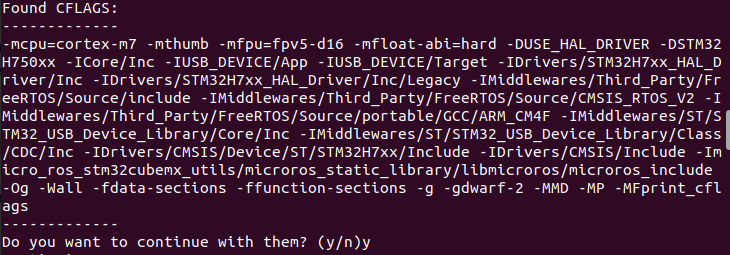
If the CFLAGS are empty, there is likely a mistake in your configuration. If you get an error about a missing separator in the Makefile, check that line carefully.
If you see an error such as:
'rcutils' exports library 'dl' which couldn't be found
this can usually be ignored.
You can now start including the micro-ROS headers in your main file and use micro-ROS in your project by following the steps below: 5. From the sample_main.c file, copy the MicroROS includes from the /* USER CODE BEGIN Includes */ section and paste them into your freertos.c file. They should look like this:
#include <stdbool.h>

#include "usb_device.h" // This is needed for the transport layer, you can use any other transport layer you want, just make sure to include the right header file for it.

#include <rcl/rcl.h>
#include <rcl/error_handling.h>
#include <rclc/rclc.h>
#include <rclc/executor.h>
#include <uxr/client/transport.h>
#include <rmw_microxrcedds_c/config.h>
#include <rmw_microros/rmw_microros.h>

#include <std_msgs/msg/int32.h>
For this example, we use the USB transport layer. You must therefore declare a variable of type USBD_HandleTypeDef in usb_device.h so that it can be passed to the transport functions:
/* USER CODE BEGIN VARIABLES */
extern USBD_HandleTypeDef hUsbDeviceFS;
/* USER CODE END VARIABLES */
Then copy the code from the /* USER CODE BEGIN 4 */ section of sample_main.c and paste it into your freertos.c file, in the section named /* USER CODE BEGIN FunctionPrototypes */. It should look like this:
bool cubemx_transport_open(struct uxrCustomTransport * transport);
bool cubemx_transport_close(struct uxrCustomTransport * transport);
size_t cubemx_transport_write(struct uxrCustomTransport* transport, const uint8_t * buf, size_t len, uint8_t * err);
size_t cubemx_transport_read(struct uxrCustomTransport* transport, uint8_t* buf, size_t len, int timeout, uint8_t* err);

void * microros_allocate(size_t size, void * state);
void microros_deallocate(void * pointer, void * state);
void * microros_reallocate(void * pointer, size_t size, void * state);
void * microros_zero_allocate(size_t number_of_elements, size_t size_of_element, void * state);
Copy the content of
StartDefaultTaskfrom sample_main.c and paste it intoStartDefaultTaskin freertos.c so that it looks like this:
void StartDefaultTask(void *argument)
{
/* init code for USB_DEVICE */
MX_USB_DEVICE_Init();
/* USER CODE BEGIN StartDefaultTask */
   // micro-ROS configuration

rmw_uros_set_custom_transport(
   true,
   (void *) &hUsbDeviceFS,
   cubemx_transport_open,
   cubemx_transport_close,
   cubemx_transport_write,
   cubemx_transport_read);

rcl_allocator_t freeRTOS_allocator = rcutils_get_zero_initialized_allocator();
freeRTOS_allocator.allocate = microros_allocate;
freeRTOS_allocator.deallocate = microros_deallocate;
freeRTOS_allocator.reallocate = microros_reallocate;
freeRTOS_allocator.zero_allocate =  microros_zero_allocate;

if (!rcutils_set_default_allocator(&freeRTOS_allocator)) {
      printf("Error on default allocators (line %d)\n", __LINE__);
}

// micro-ROS app

rcl_publisher_t publisher;
std_msgs__msg__Int32 msg;
rclc_support_t support;
rcl_allocator_t allocator;
rcl_node_t node;

allocator = rcl_get_default_allocator();

//create init_options
rclc_support_init(&support, 0, NULL, &allocator);

// create node
rclc_node_init_default(&node, "cubemx_node", "", &support);

// create publisher
rclc_publisher_init_default(
   &publisher,
   &node,
   ROSIDL_GET_MSG_TYPE_SUPPORT(std_msgs, msg, Int32),
   "cubemx_publisher");

msg.data = 0;
/* Infinite loop */
for(;;)
{
   rcl_ret_t ret = rcl_publish(&publisher, &msg, NULL);
   if (ret != RCL_RET_OK)
   {
      printf("Error publishing (line %d)\n", __LINE__);
   }

   msg.data++;
   osDelay(10);
}
/* USER CODE END StartDefaultTask */
}
Do not forget to add the
MX_USB_DEVICE_Init()call in your main function to initialize the USB device (or any other transport layer you are using) before starting the scheduler. It should look like this:
 /* USER CODE BEGIN 2 */
MX_USB_DEVICE_Init();
/* USER CODE END 2 */
In recent versions of CubeMX this function is automatically called in StartDefaultTask in freertos.c file.
You may sometimes encounter the following error:
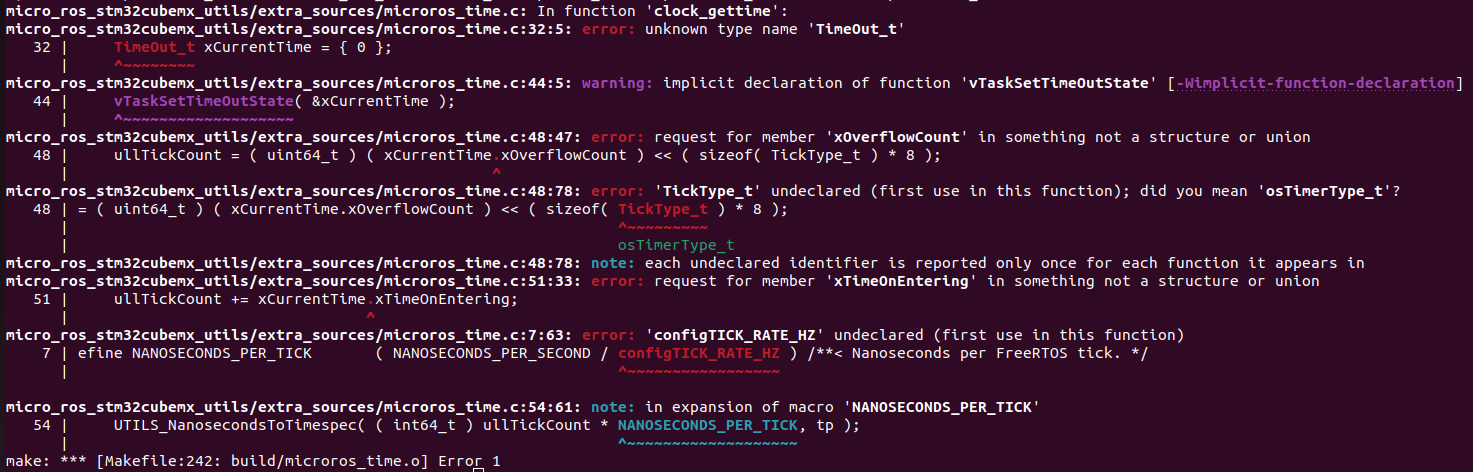
Add these two lines to /Drivers/CMSIS/RTOS2/Include/cmsis_os2.h at the end of the include section:
#include "FreeRTOS.h"
#include "task.h"
3. Flashing your code
To flash your code to the microcontroller, you need to have STM32CubeProgrammer installed on your computer. You can download it from this link: https://www.st.com/en/development-tools/stm32cubeprogrammer.html. Once you have it installed, follow these steps: 1. Connect your microcontroller to your computer using a USB cable. 2. Connect your ST-Link debugger to your microcontroller and to your computer. 3. Open STM32CubeProgrammer and select the ST-Link debugger as the programming interface. 4. Click on the “Connect” button to connect to your microcontroller. 5. Once connected, click on the “Open file” button and select the .elf file generated by your build process (it should be located in the “build” folder of your project). 6. In Erasing & programming menu, click on the “Start Programming” button to flash the code to your microcontroller.
On a STM32H750VBT6, on this last step you might get an error about the DTCMRAM memory being overflowed :

To fix this you need to modify the .ld file :
/* Uninitialized data section */
. = ALIGN(4);
.bss :
{
   /* This is used by the startup in order to initialize the .bss section */
   _sbss = .;         /* define a global symbol at bss start */
   __bss_start__ = _sbss;
   *(.bss)
   *(.bss*)
   *(COMMON)

   . = ALIGN(4);
   _ebss = .;         /* define a global symbol at bss end */
   __bss_end__ = _ebss;
} >DTCMRAM /*Replace DTCMRAM with RAM*/
This modification aims to change the memory region where the .bss section is located, by default it’s located in DTCMRAM which is a small memory region of 128KB, and if your application uses more than 128KB of uninitialized data it will overflow and cause an error. By changing it to RAM, you are using the main memory of the microcontroller which is much larger and can handle more uninitialized data.
4. Create and run your MicroROS agent
Now you need a micro-ROS agent. It’s responsible to create the communication between your embedded controller and the rest of your ROS 2 software. Create a different folder that will be used as a ROS 2 workspace.
A. Micro-ROS Agent Deployment Script
This automated Bash script runs on your host PC, creates the shared workspace, injects the internal container initialization configurations, and handles the deployment automatically.
You can download it here setup_agent.sh
#!/bin/bash
# ==============================================================================
# CONFIGURATION SCRIPT FOR MICRO-ROS AGENT IN DOCKER
# To be executed on the host machine
# ==============================================================================

# Stops the script if any error is detected
set -e

echo "======================================================="
echo "1/4: Setting up the shared workspace for the micro-ROS agent..."
echo "======================================================="
WS_PATH="$PWD/docker_ros2_ws"
mkdir -p "$WS_PATH/src"

echo "======================================================="
echo "2/4: Creating the internal automation script..."
echo "======================================================="
# We create a temporary script that Docker will execute as soon as it starts,
# this script will handle all the installation and configuration inside the container.
cat << 'EOF' > "$WS_PATH/inside_setup.sh"
#!/bin/bash
set -e

echo "--- [DOCKER] System update and installation of core tools ---"
apt update && apt install -y python3-pip git vim tmux

echo "--- [DOCKER] Cloning micro_ros_setup (Branch: humble) ---"
cd /ros2_ws
if [ ! -d "src/micro_ros_setup" ]; then
   git clone -b humble https://github.com/micro-ROS/micro_ros_setup.git src/micro_ros_setup
else
   echo "Repository already exists, skipping step."
fi

echo "--- [DOCKER] Initializing and updating rosdep ---"
rosdep update
rosdep install --from-paths src --ignore-src -y

echo "--- [DOCKER] Building the workspace base ---"
source /opt/ros/humble/setup.bash
colcon build

echo "--- [DOCKER] Downloading Agent source files ---"
source install/local_setup.bash
ros2 run micro_ros_setup create_agent_ws.sh

echo "--- [DOCKER] Final compilation of the actual Agent (This step takes time) ---"
ros2 run micro_ros_setup build_agent.sh

echo "--- [DOCKER] Saving configuration to container's bashrc ---"
if ! grep -q "source /ros2_ws/install/local_setup.bash" ~/.bashrc; then
   echo "source /opt/ros/humble/setup.bash" >> ~/.bashrc
   echo "source /ros2_ws/install/local_setup.bash" >> ~/.bashrc
fi

echo "======================================================="
echo " COMPILATION COMPLETED SUCCESSFULLY INSIDE DOCKER!"
echo "======================================================="
echo "To launch the agent now, run:"
echo "ros2 run micro_ros_agent micro_ros_agent serial --dev /dev/ttyACM0"
echo "======================================================="

# Let the terminal open in Docker so the user can run commands after the setup is done
bash
EOF

chmod +x "$WS_PATH/inside_setup.sh"

echo "======================================================="
echo "3/4: Deploying Docker container (ros:humble)..."
echo "======================================================="
# We launch the container with full access to USB devices (/dev) and the network (--net=host)
# It automatically runs the inside_setup.sh script we just created
docker run -it \
--net=host \
--privileged \
-v /dev:/dev \
-v "$WS_PATH:/ros2_ws" \
--name uros_agent_container \
ros:humble \
/ros2_ws/inside_setup.sh
Once the agent is built, you can run it with the following command (adjust the device path if needed):
ros2 run micro_ros_agent micro_ros_agent serial --dev /dev/ttyACM0In another terminal, run the following command to verify that the topic is being published correctly:
ros2 topic echo /cubemx_publisher
Before running this command, make sure you are inside the Docker container. If not, start it with:
sudo docker exec -it uros_agent_container bash
source /ros2_ws/install/local_setup.bash
To list available topics, run ros2 topic list.
To exit the Docker container, type exit.
To stop the container and remove it, run the following command on the host terminal (before reusing the deployment script, you must stop and remove the previous container to avoid conflicts):
sudo docker stop uros_agent_container
sudo docker rm uros_agent_container
Support and Resources
For additional help: